While individual agent devices or software products can be tagged directly from the individual asset's details screen, and new and existing tags and category of tags (tag types) can be managed from the tag settings screen found from the Settings->Tagging, Applixure Analytics also has functionality to assign number of tags to number of assets in one go.
Please note that all tag management functionality described below necessitates that the user account has been granted permissions to manage tagging.
You can access mass operations for tagging from the Settings screen, under individual environment's settings (tags are defined on per environment basis) using selection called Bulk operations:
Once in the bulk operations -screen, follow the steps below for setting multiple tags for multiple assets (either agent devices or software products):
- First you need to create a CSV (comma separated values) file to import to Analytics, which lists all tags to assign and agent devices or software products to associate those tags with.
You can only bring in tags for devices or products in one go, but not both. If you need to tag both devices and products, you need to perform two separate CSV file imports.
CSV file needs to be saved in UTF8 format, and must contain three columns, separated by either commas (,) or semicolons (;). You can double-quote each column if it contains the separator character.
If you export CSV file from Microsoft Excel (using Save As -functionality), please make sure to select UTF-8 as encoding in Save As dialog when saving as CSV.
Three columns that must be present in the CSV file are:
FOR AGENT DEVICES TAGGING:
column 1: device's host name or serial number, this is used for matching to existing agents in your environment
column 2: tag type for tag to associate with device in column 1
column 3: tag value for tag to associate with device in column 1
An example would be: "johns-pc";"Building";"123"
FOR SOFTWARE PRODUCT TAGGING:
column 1: software product's name, this is used for matching to existing software in your environment
column 2: tag type for tag to associate with product in column 1
column 3: tag value for tag to associate with product in column 1
An example would be: "Adobe Photoshop CS6";"Usage department";"Marketing"
You can list the same device or product multiple times in different rows, if you wish to assign multiple different tags to the same asset.
If tag type or tag value is not found pre-existing in your Applixure Analytics environment, they will automatically be created during import.
Note: If you are importing device tags and matching pre-existing tag type exists in your environment which does not have devices set as its context, the import line will be skipped as the existing tag type is meant only for software-related tags. Similarly, importing software tags and specifying existing tag type which does not have software as context will be skipped.
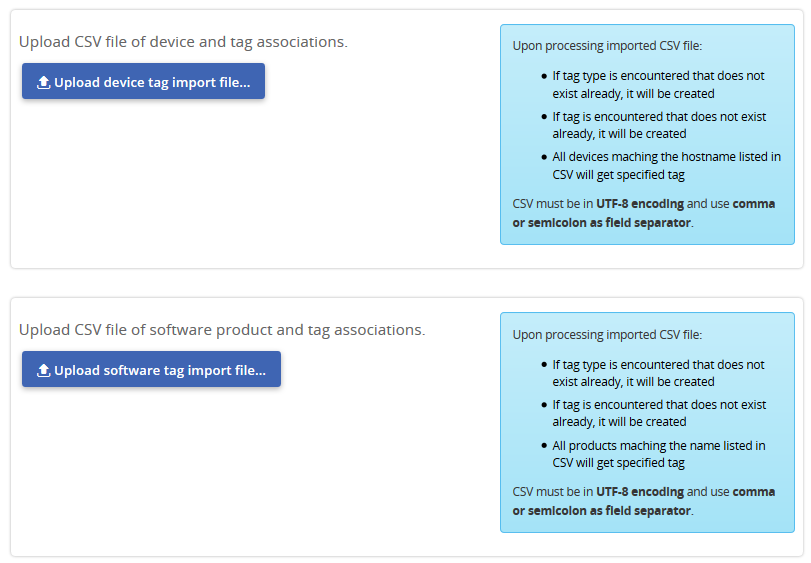
You can download example CSV file for devices tagging and for software tagging as attachements to this article, these will contain the correct encoding and fields. Please note that these example files have header row for describing the fields; you may omit header row as Analytics will try to process all rows unless it detects the exact same headers as in the sample file in which case the first row is skipped. - Once you have CSV file ready, you can import it for processing using either Upload device tag import file or Upload software tag import file -buttons on the Bulk Operations page.
If you have large number of devices and/or products in your environment, processing and matching may take a while, please be patient.
No new tag types or tag values will be created during this phase, or tags associated with any of the listed assets! Analytics will show you preview of tagging operations to be performed and ask for confirmation before actually doing any mass operation.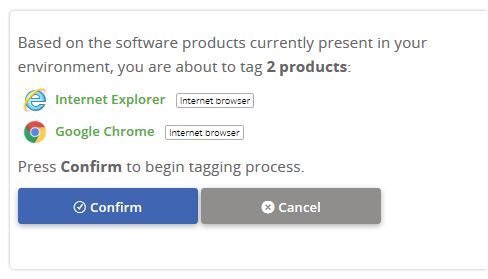
Please note that any devices or software products for which match could not be found are simply skipped. - After you have reviewed that bulk tagging operation is what is intended, you can press Confirm -button to start importation. Again, if there is large number of assets to process, this may take a while to complete.
- After tagging has been done, you will be notified of the bulk operation's result.

0 Comments